3 Min Quick Example: Docker + Speedup with vLLM#
Introduction#
After this quick 3-minute example, you will know how to install LMCache and see that it speeds up the inference by 6X.

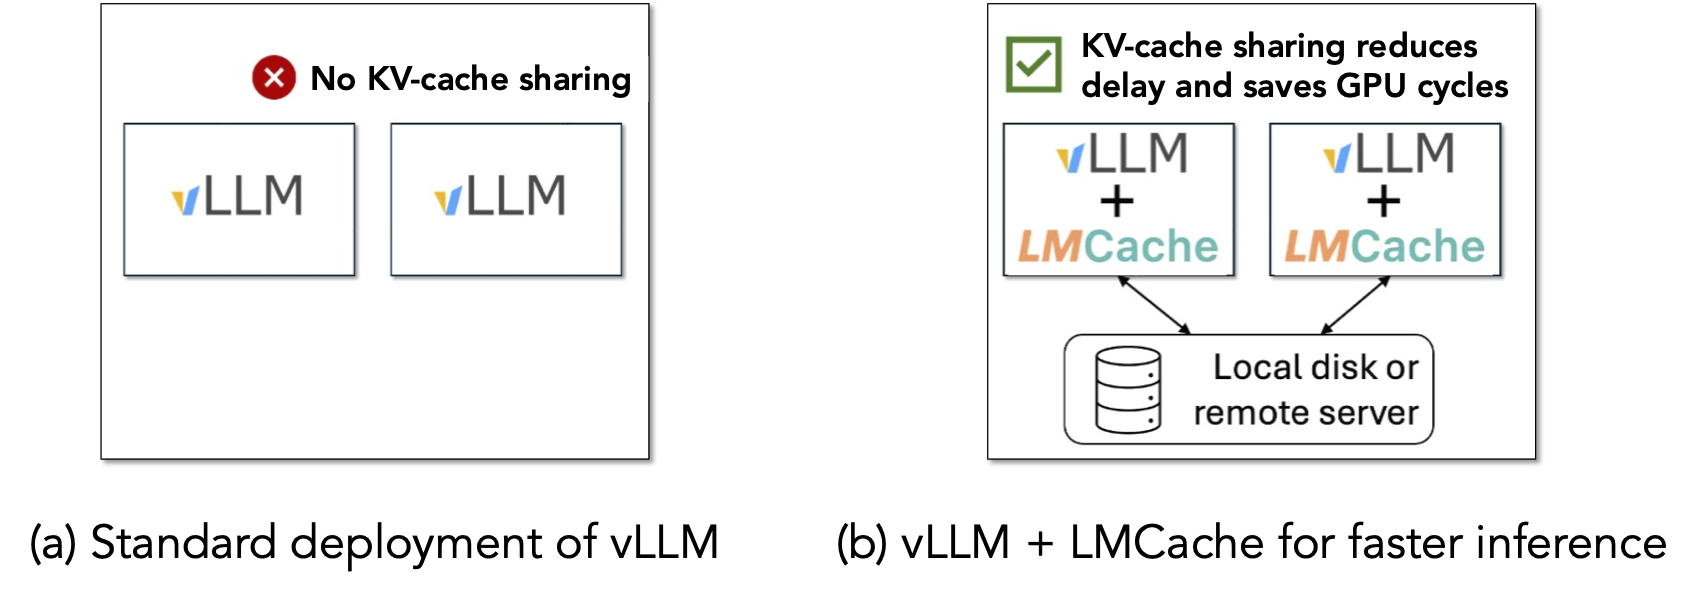
As shown in the above figure, this demo shows that different vLLM instances can share the prefix KV cache between each other by using LMCache on a single machine, so that the KV cache generated by one vLLM instance can be reused by another.
Note
This demo takes around 3 minutes after the Docker image and model weights are downloaded.
Prerequisites#
4 Nvidia A6000 or A40 GPU on the same machine
Local SSD disk with peak IO bandwidth > 3GB/s (typical speed for SATA3 SSDs)
docker compose installed on the machine
sudo access to run
docker compose upA huggingface token with access to
mistralai/Mistral-7B-Instruct-v0.2.A local Python environment which can run
pip install.Docker NVIDIA Runtime installed on the machine.
Note
For more information on Huggingface login, please refer to the Huggingface documentation.
Run the demo#
$ git clone https://github.com/LMCache/demo.git
$ cd demo/demo4-compare-with-vllm
$ echo "HF_TOKEN=<your HF token>" >> .env
$ pip install streamlit openai transformers sentencepiece
$ sudo docker compose up -d
$ bash start_ui.sh
Please replace <your HF token> with your huggingface token in the bash script above.
Note
If model weights are not downloaded, they might need to be downloaded manually. This prevents multiple serving engines from downloading the same model weights and cause potential write conflicts. For this you can use:
from transformers import AutoModelForCausalLM, AutoTokenizer

model_name = "mistralai/Mistral-7B-Instruct-v0.2"
model = AutoModelForCausalLM.from_pretrained(model_name)
tokenizer = AutoTokenizer.from_pretrained(model_name)

cache_dir = "~/.cache/huggingface/"

model.save_pretrained(cache_dir)
tokenizer.save_pretrained(cache_dir)
Refer to the Model saving for more information.
Once you see the following line You can now view your Streamlit app in your browser, open your browser
and view the webUI at the following URLs:
LOCAL_URL http://localhost:8501
NETWORK_URL http://<YOUR IP>:8501
EXTERNAL_URL http://<YOUR IP>:8501
What happens when you run the demo?#
After you run the script above, two serving engine instances, a standard vLLM and a LMCache-enabled vLLM, are now started on two GPUs. Each instance is warmed-up with one query on a long document, which will be reused as the context later.
When you open the WebUI on the browser on http://localhost:8501, it triggers the backend to start two new engine instances, a second standard vLLM and a second LMCache-enabled vLLM on the two unused GPUs. Note that the standard vLLM does not share KV cache across different GPUs.
What steps do you need to perform?#
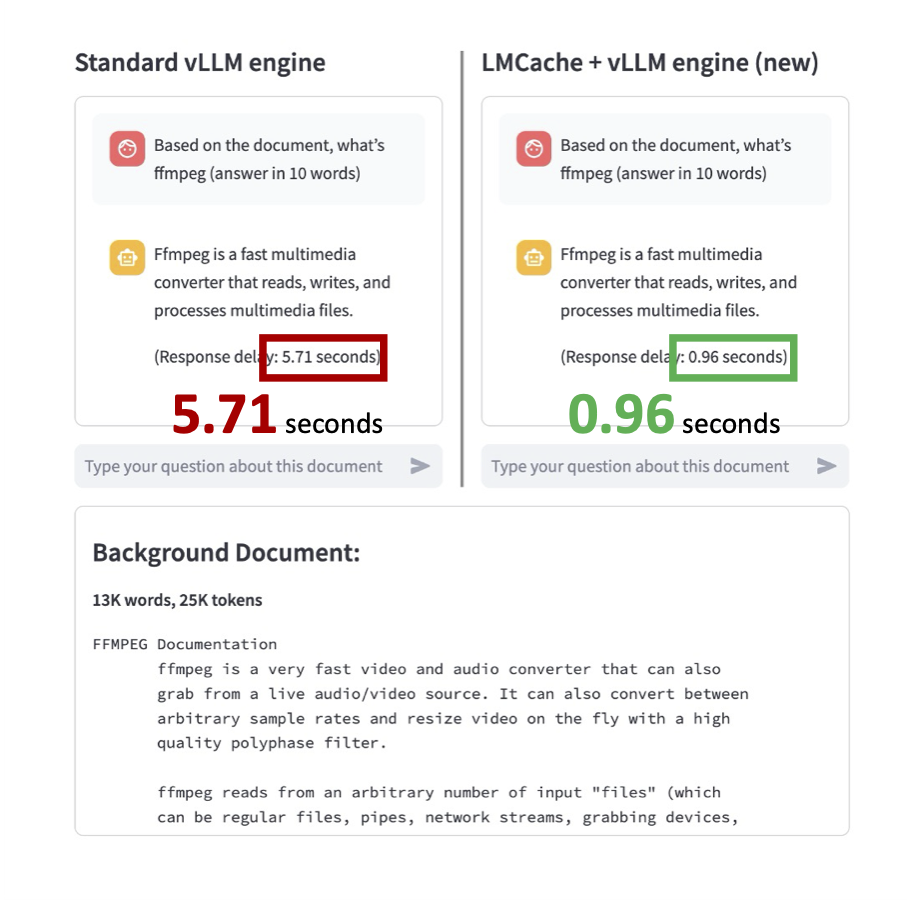
For the demo, let’s issue the same query as follows to both engines, and see which one is FASTER!
Based on the document, what's ffmpeg (answer in 10 words)
(In this case, the default context of the queries is a ffmpeg manual.)
Type in the query to both Standard vLLM Engine (on the left) and LMCache + vLLM Engine (new) (on the right)
and see the speedup for yourself!

You will see that the LMCache + vLLM Engine (New) is almost 6X faster than the Standard vLLM Engine.
Clean up#
Use Ctrl+C to terminate the frontend, and then run sudo docker compose down
to shut down the service.
The source code of this demo is available at code.